
AI-generated images often fail to look the way we expect.
Beginners commonly face issues such as:
- Everything in the image is sharp, so it looks flat and “digital”
- Background blur appears in random places, not behind the subject
- The wrong subject is in focus while the main character is blurry
- Bokeh looks artificial, messy, or inconsistent between images
Most of these problems are caused not by the AI model itself, but by a missing understanding of a fundamental photography concept:
aperture & depth of field.
Understanding this principle allows you to create more cinematic, story-driven, and visually appealing prompts—regardless of the model you use.
1. Introduction to Aperture & Depth of Field

In real photography, aperture is the opening inside the lens that lets light through. It is usually written as f/1.4, f/2.8, f/5.6, f/11, etc.
-
Lower f-number (f/1.4, f/2, f/2.8)
- Aperture is wide open
- Lets in more light
- Creates shallow depth of field: only a small area is sharp, everything else becomes blurry
-
Higher f-number (f/8, f/11, f/16)
- Aperture is more closed
- Lets in less light
- Creates deep depth of field: much more of the scene is in focus
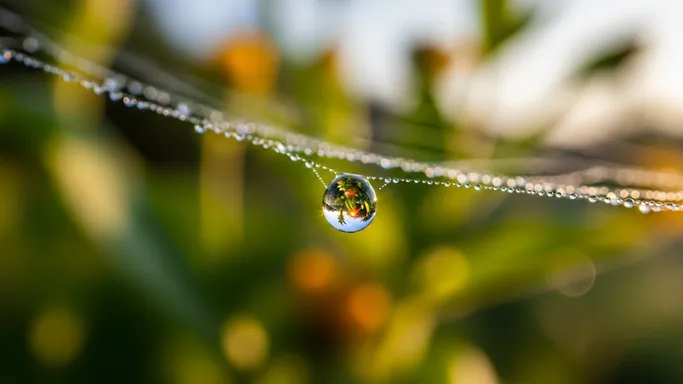
Depth of field (DOF) means how much of the image (from front to back) appears sharp.
-
Shallow DOF
-
Subject in focus, background and foreground blurred
-
Strong separation, cinematic feeling
-
Often used in portraits and product shots
-
Deep DOF - Most of the scene is in focus - Good for landscapes, architecture, documentary-style scenes - Feels more “informational” than cinematic
For AI image generation, the model does not physically change aperture, but it understands the visual style of:
- “shallow depth of field”, “f/1.8”, “wide aperture”, “creamy bokeh”
- “deep focus”, “f/8”, “everything in sharp detail”
By controlling these keywords, you tell the AI what should be sharp and what should gently disappear into blur.
2. Applying Aperture & Depth of Field in Prompt Writing
Here we convert aperture and depth of field into practical prompt patterns you can reuse.
2-1. When to Use It
Use aperture / depth-of-field keywords whenever you want to:
- Emphasize one main subject and de-emphasize the background
- Create a cinematic or dreamy look with smooth blur and bokeh
- Show rich detail everywhere in a scene (deep focus storytelling)
- Guide the viewer’s eye to the most important part of the frame
Typical use cases:
-
Portraits & Character Close-Ups
- Use shallow depth of field / wide aperture
- Keywords: “shallow depth of field”, “f/1.8”, “f/2.0”, “creamy background bokeh”
- Result: subject pops out, background becomes soft and pleasant
-
Product Photography
- Use controlled shallow DOF
- Focus on product details, blur background to remove distractions
- Keywords: “sharp focus on [product], blurred background, studio-style bokeh”
-
Cinematic Story Frames
- Subject in focus, environment softly blurred, lights turning into bokeh
- Keywords: “cinematic shallow DOF”, “bokeh lights in the background”
-
Landscape / Architecture / Documentary Scenes
- Use deep depth of field
- Keywords: “deep focus”, “f/8”, “everything in sharp detail”
- Result: viewer can explore the entire scene clearly
Whenever your image feels flat, busy, or hard to read, adjusting depth of field in your prompt is often the easiest way to fix it.
2-2. Common Problems It Solves
Let’s connect aperture & depth of field to frustrations users often have.
-
“The image looks flat and not cinematic.”
- Cause: everything is equally sharp; no separation between subject and background.
- Fix: add shallow DOF and bokeh keywords:
- “shallow depth of field, background softly blurred”
- “cinematic f/1.8, creamy bokeh lights”
-
“AI blurred the wrong thing (background sharp, subject mushy).”
- Cause: the model is unclear about what the main subject is.
- Fix: clearly specify focus target + DOF:
- “sharp focus on the woman’s eyes, shallow depth of field in the background”
- “focus on the product label, background out of focus”
-
“There’s too much going on in the background; it’s distracting.”
- Cause: deep focus with a noisy environment.
- Fix: use stronger blur to simplify:
- “background softly out of focus, subtle bokeh, attention on the subject”
-
“My environment shots look too soft; I want everything detailed.”
- Cause: prompts accidentally imply shallow DOF or generic ‘soft’ look.
- Fix: specify deep DOF / higher f-stop:
- “deep focus, f/8, crisp detail from foreground to background”
- “landscape with everything in sharp focus, no blur”
-
“My bokeh looks weird or fake.”
- Cause: the model is improvising blur without clear instructions.
- Fix: describe shape and behavior:
- “smooth round bokeh”, “subtle cinematic bokeh”, “soft defocused city lights”
2-3. Prompt Examples
You can copy and adapt the following prompts directly.
“Cinematic portrait of a woman in a dimly lit café, sharp focus on the eyes, shallow depth of field, f/1.8, warm creamy bokeh lights in the background, high-resolution photograph.”
“Product shot of a perfume bottle on a reflective table, sharp focus on the logo, blurred background, studio lighting, shallow DOF, elegant soft bokeh.”
“Wide landscape of mountains and a lake at sunrise, deep focus, f/11, everything in sharp detail from foreground rocks to distant peaks, high dynamic range.”
“Street scene at night in a busy city, subject in focus, background motion blur and soft bokeh, cinematic shallow depth of field, realistic photograph.”
“Interior architecture shot of a modern lobby, deep depth of field, f/8, all structural lines and textures clearly visible, ultra-sharp details.”
When testing, try changing only the DOF/ aperture-related parts and see how the visual weight and mood of the image change.
2-4. Detailed Use Cases
Below are concrete scenarios with suggested images and what is happening in terms of aperture and depth of field.
Use Case 1: Portrait – Flat vs Cinematic
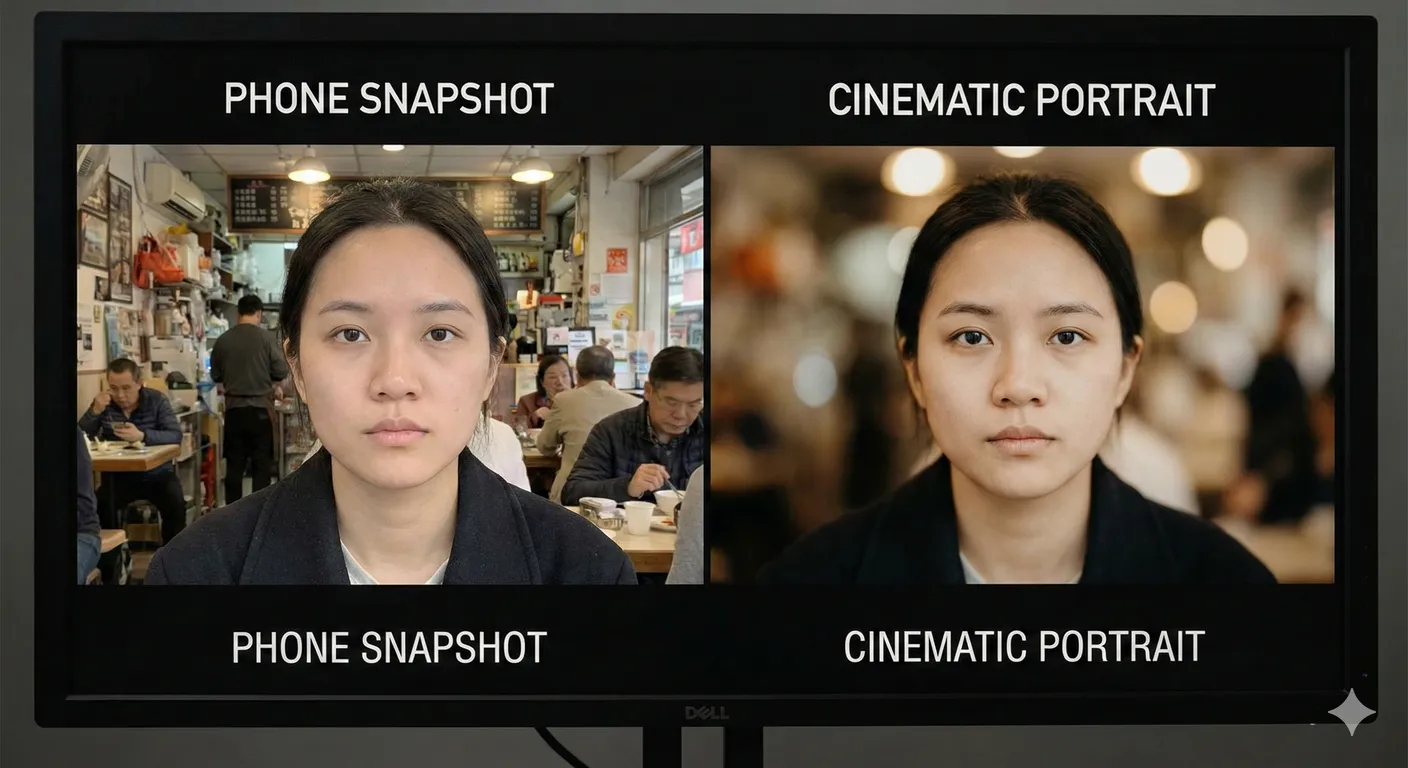
What changed and why:
The flat image feels more like a phone snapshot. The shallow DOF image isolates the face, reducing background noise and creating a cinematic, professional look. In prompts, combine: “sharp focus on the eyes, shallow depth of field, f/1.8, creamy bokeh.”
Use Case 2: Product Focus Control
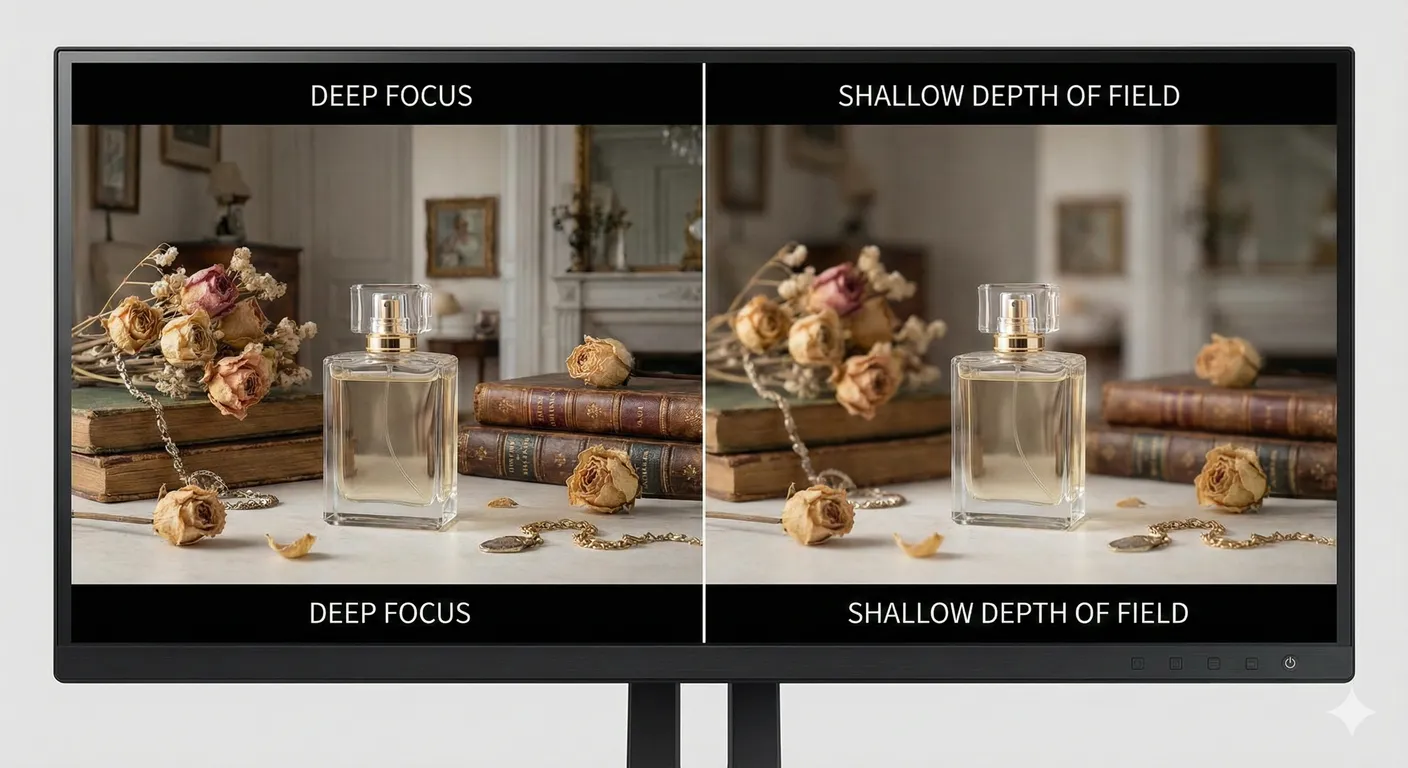
What changed and why: Deep focus makes the viewer’s eye jump around the frame. Shallow DOF with clear focus instructions (“focus on the perfume bottle”) tells AI to highlight the product and demote everything else to supporting background.
3. What You Can Do Now (Practical Benefits)
Once you understand aperture and depth of field, you can:
- Control what the viewer looks at first by choosing what is sharp and what is soft.
- Turn “busy” AI images into clean, readable compositions with simple background blur.
- Create cinematic portraits and product shots with professional-looking bokeh.
- Switch between documentary-style deep focus and artistic shallow focus depending on your story.
- Give AI models clearer instructions, reducing random or unnatural blur.
From now on, do not just say “a portrait” or “a scene” in your prompts. Add how focused and how blurry it should be.
4. Differences between Aperture & Depth of Field and Focal Length
Beginners often mix up aperture & depth of field with focal length, because both affect how a scene looks.
Here is an easy way to separate them:
-
Aperture & Depth of Field
- Controls how much of the image is in focus from front to back.
- Keywords: “shallow depth of field”, “deep focus”, “f/1.8”, “f/8”, “bokeh”, “blurred background”.
- Question it answers: “What is sharp, and what is soft?”
-
Focal Length
- Controls how wide or zoomed-in the scene appears and how compressed or stretched space feels.
- Keywords: “24mm wide-angle”, “35mm”, “50mm”, “85mm portrait lens”, “135mm telephoto”.
- Question it answers: “How much of the scene do we see, and how is space shaped?”
Important:
- You can have shallow DOF with both a 35mm and an 85mm lens (e.g., “35mm, f/1.4” vs “85mm, f/1.8”).
- You can also have deep DOF with almost any focal length by using higher f-stops (e.g., “f/11 deep focus”).
In AI prompts, you will often combine both:
“Cinematic portrait shot on an 85mm portrait lens, shallow depth of field, f/1.8, creamy bokeh.”
Here, “85mm portrait lens” sets the framing and compression, while “shallow depth of field, f/1.8, creamy bokeh” defines focus behavior and blur.
5. Summary & Practice Exercises
Summary
- Aperture controls how wide the lens opens (written as f/1.8, f/2.8, f/8, etc.).
- Depth of field describes how much of the image is sharp from front to back.
- Shallow DOF (f/1.4–f/2.8) is great for portraits, products, and cinematic scenes where you want background blur and strong subject separation.
- Deep DOF (f/8–f/16) is ideal for landscapes, architecture, and documentary scenes where everything should be clear.
- In prompts, combining focus target (“sharp focus on the eyes”) with DOF keywords (“shallow depth of field, bokeh background”) gives AI precise visual instructions.
- Aperture/DOF and focal length are different but complementary: one controls focus depth, the other controls field of view and spatial compression.
Practice Exercise: Basic Comparison
Try these exercises to build intuition about aperture & depth of field in AI images.
-
Portrait Focus Comparison
Generate two versions of the same portrait:- “Portrait of a young woman, deep focus, f/8, everything in sharp detail, neutral background.”
- “Portrait of a young woman, sharp focus on the eyes, shallow depth of field, f/1.8, creamy bokeh background.”
Compare how your eye moves through each image and how professional each one feels.
-
Product Isolation Exercise
Generate two product shots:- “Skincare bottle on a bathroom counter, deep focus, background tiles sharp and detailed.”
- “Skincare bottle on a bathroom counter, sharp focus on the bottle, blurred background, shallow depth of field, studio-style bokeh.”
Decide which version feels more like a commercial advertisement.
-
Landscape Story Exercise
Generate two landscapes:- “Mountain landscape at sunrise, deep focus, f/11, everything from foreground grass to distant peaks in sharp detail.”
- “Mountain landscape at sunrise, sharp focus on a flower in the foreground, background mountains softly blurred, shallow depth of field.”
Observe how the story changes when only one plane is sharp.
-
Night City Bokeh Exercise
Generate two night city scenes:- “Man walking in a city at night, no background blur, all signs and buildings sharp.”
- “Man walking in a city at night, sharp focus on the man, shallow depth of field, soft round bokeh from neon signs in the background.”
Compare how cinematic the second version feels and how much more clearly the subject stands out.
By repeating these comparisons, you will start to “feel” how aperture and depth-of-field keywords steer AI-generated images—and you will be able to design focus and blur as deliberately as a real photographer.