
AI-generated images often fail to look the way we expect.
Beginners commonly face issues such as:
- Faces that look stretched, squashed, or “balloon-like”
- Characters that change face shape from image to image
- Backgrounds that look too far away or strangely compressed
- Scenes that feel “flat” instead of cinematic
Most of these problems are caused not by the AI model itself, but by a missing understanding of a fundamental photography concept:
focal length.
Understanding this principle allows you to create more consistent, realistic, and intentional prompts—regardless of the model you use.
1. Introduction to Focal Length
In simple terms, focal length controls how “close” or “far” things look in a photo, and how much of the scene fits into the frame.
You can think of it like this:
-
Short focal length (e.g., 20–35mm)
-
Feels wide, shows a lot of background
-
Exaggerates distance and perspective
-
Can make faces or bodies look stretched if used too close
-
Medium focal length (e.g., 35–70mm)
-
Natural, similar to how our eyes see
-
Good balance between subject and environment
For AI image generation, you are not actually changing a real lens, but the model understands these words as visual styles. When you specify focal lengths like “35mm” or “85mm portrait lens,” the AI adjusts:
- The field of view (how much of the scene is visible)
- The shape of faces and bodies
- The relationship between subject and background
By controlling focal length in prompts, you can avoid warped faces, inconsistent proportions, and awkward perspectives—and get closer to the look of professional photography.
2. Applying Focal Length in Prompt Writing
In this section, we turn focal length into practical prompt tools you can reuse.
2-1. When to Use It
Use focal length keywords whenever you care about:
- How close the viewer feels to the subject
- How much background you want in the frame
- How natural and flattering the face and body should look
Typical use cases:
-
Portraits (Headshots / Bust Shots)
- Use 85mm–135mm
- Reason: more flattering, less distortion, smoother features
- Good for profile photos, beauty images, editorial portraits
-
Full-Body Fashion / Street Scenes
- Use 35mm–50mm
- Reason: keeps the body natural while still showing environment
- Good for fashion lookbooks, street photography style, lifestyle scenes
-
Environmental Portraits (Character + Background Story)
- Use 24mm–35mm
- Reason: shows more context—room, street, workplace—without going extreme wide
- Good for storytelling images, cinematic frames
-
Distant / Compressed Scenes (Cinematic Telephoto Feel)
- Use 85mm–200mm
- Reason: brings background closer, compresses space, feels “cinematic” and dramatic
- Good for characters against city skylines, mountains, neon signs, etc.
Whenever you write a prompt involving people, adding a focal length is one of the simplest ways to stabilize style and proportions.
2-2. Common Problems It Solves
Let’s connect focal length to typical AI frustrations.
-
“The face looks weird or stretched.”
- Cause: model “guesses” a wide-angle close-up.
- Fix: specify a portrait focal length:
- “shot with an 85mm portrait lens”
- “telephoto portrait, 105mm focal length”
-
“Background looks too far away or empty.”
- Cause: simulated wide-angle with lots of empty space.
- Fix: use longer focal lengths to compress background:
- “telephoto 135mm, compressed background”
- “city lights close behind the subject, 200mm lens look”
-
“Character proportions change between shots.”
- Cause: prompts lack clear camera settings, so the model changes its internal “lens.”
- Fix: decide on 1–2 standard focal lengths and repeat them:
- Always using “50mm” for storytelling scenes
- Always using “85mm portrait lens” for character close-ups
-
“The scene doesn’t feel cinematic enough.”
- Cause: generic view with no intentional perspective.
- Fix: reference focal lengths tied to film language:
- “35mm handheld cinematic frame”
- “telephoto 135mm shot, shallow depth, compressed background”
2-3. Prompt Examples
You can copy and adapt the following prompts directly.
“A cinematic portrait of a young woman standing near a window, soft natural light on her face, shot with an 85mm portrait lens, natural face proportions, gently blurred background, high-resolution photograph.”
“Street-style full-body shot of a man walking across a crosswalk, 35mm focal length, slight wide-angle feel, environment visible around him, natural body proportions, urban documentary photography.”
“Two characters on a rooftop at sunset, city skyline glowing behind them, 135mm telephoto look, compressed background, cinematic framing, high dynamic range.”
“Environmental portrait of an artist in a cluttered studio, 28mm wide-angle, showing lots of background detail, slight perspective exaggeration, documentary photography style.”
When you modify your prompt, try changing only the focal length and see how the scene feeling, background, and face proportions shift.
2-4. Detailed Use Cases
Below are concrete scenarios with suggested images and what is happening in terms of focal length.
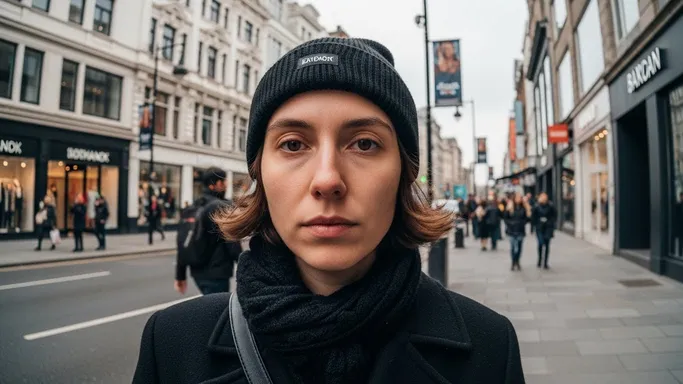
Use Case 1: Portrait – Distorted vs Natural Face
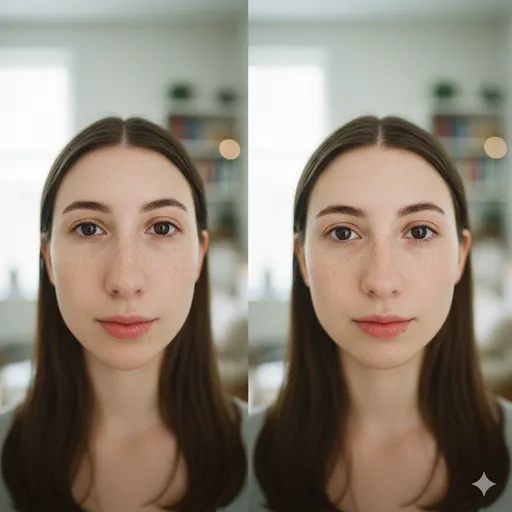
What changed and why:
The 24mm image feels more “in your face” and slightly cartoonish. The 85mm version compresses the face slightly, which people usually perceive as more flattering and realistic. For character portraits, “85mm portrait lens” is a strong default.
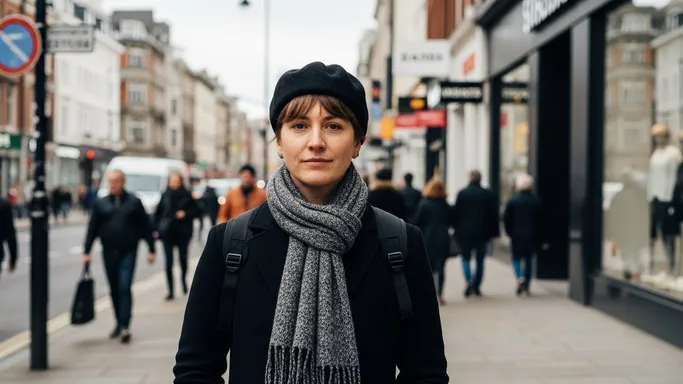
Use Case 2: Fashion Full-Body vs Tight Crop

What changed and why:
35mm lets you include more architecture, pavement, and surrounding people, useful for fashion storytelling. 70mm zooms in and reduces background distractions. Changing focal length tells the AI whether to prioritize outfit + environment or outfit + body details.
Use Case 3: Cinematic Telephoto City Scene
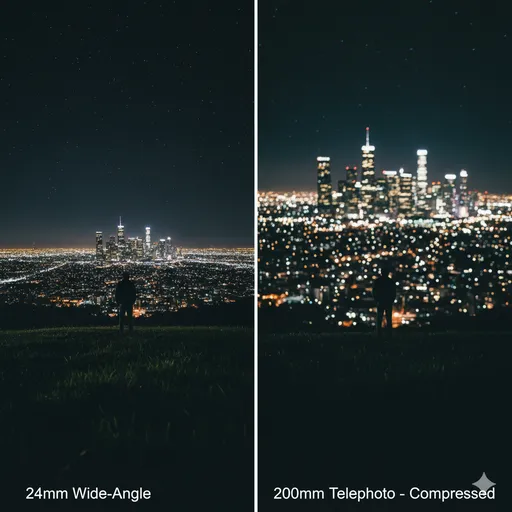
What changed and why:
The telephoto-style scene feels denser and more dramatic—the background lights look bigger and closer, almost wrapping around the character. The wide-angle scene feels more open and distant. If you want that classic “compressed” movie shot, use focal lengths like 85mm, 135mm, or 200mm.
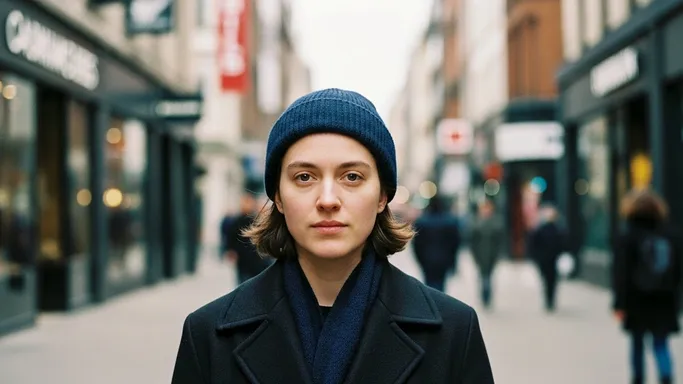
Use Case 4: Environmental Storytelling
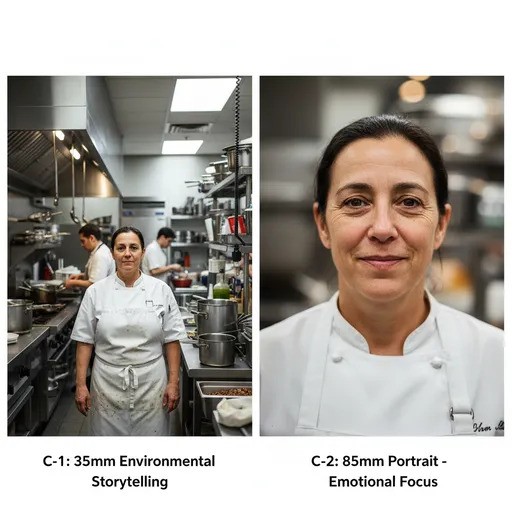
What changed and why:
The 28mm frame tells a story about the space and environment. The 85mm frame tells a story about the person and their emotion. Both are valid, but your choice of focal length should match your narrative goal.
3. What You Can Do Now (Practical Benefits)
By understanding focal length, you can:
- Stabilize your character designs so they look more consistent across different prompts.
- Avoid unintentional distortion in faces and bodies, especially for close-ups.
- Choose how much environment to include, making your scenes either intimate or expansive.
- Create more cinematic frames by mimicking how real movies use lenses.
- Communicate more clearly with AI models, using language that aligns with real photography.
From now on, treat focal length as a core part of your prompt:
Not just “a portrait,” but “a portrait shot with an 85mm lens, natural proportions.”
4. Differences between Focal Length and Perspective
Beginners often confuse focal length with perspective.
-
Focal length
- A property of the lens (or the “lens style” in AI).
- Controls field of view and how compressed or stretched a scene looks.
- In prompts: “24mm wide-angle,” “50mm standard,” “85mm portrait lens,” “135mm telephoto.”
-
Perspective
- About the camera position relative to the subject.
- Changing where the camera stands (high angle, low angle, close, far) changes how shapes and distances appear.
- In prompts: “low-angle shot,” “high-angle view,” “from a distance,” “extreme close-up.”
Key idea:
- If you move the camera closer but keep the same focal length, perspective changes.
- If you change the focal length but imagine the camera in the same place, the field of view changes and the sense of compression changes.
In AI prompts, you often combine both:
“Low-angle shot of a hero standing on a rooftop, 35mm lens, city in the background.”
Here, “low-angle shot” describes perspective, and “35mm lens” describes focal length. They work together to define the final look.
5. Summary & Practice Exercises
Summary
- Focal length controls how much of the scene fits into the frame and how “compressed” or “stretched” things appear.
- Short focal lengths (e.g., 24–35mm) show more environment but can distort faces if used too close.
- Medium to long focal lengths (e.g., 50–135mm) create more natural or flattering portraits and compress the background.
- In AI prompts, specifying focal length reduces randomness and stabilizes face and body proportions.
- Focal length and perspective are related but different: focal length is lens style, perspective is camera position.
- Reusing a small set of focal length phrases (35mm, 50mm, 85mm, 135mm) keeps your visual style consistent across images.
Practice Exercise: Basic Comparison
Try these exercises to feel how focal length changes your AI results.
-
Portrait Comparison
- Generate a close-up portrait with:
- “close-up portrait, 24mm wide-angle, bright natural light”
- “close-up portrait, 85mm portrait lens, bright natural light”
- Compare face shape, nose size, and background.
- Generate a close-up portrait with:
-
Full-Body vs Environmental Story
- Generate a full-body character shot with:
- “full-body shot, 35mm focal length, environment visible, urban street scene”
- “full-body shot, 70mm focal length, background softer, more focus on character”
- Observe how the world around the subject changes.
- Generate a full-body character shot with:
-
Cinematic City Scene
- Generate two rooftop scenes at night:
- “cinematic rooftop scene, 24mm wide-angle, small distant city lights”
- “cinematic rooftop scene, 135mm telephoto look, compressed city lights, large bokeh in the background”
- Compare how dramatic and close the city feels.
- Generate two rooftop scenes at night:
-
Consistency Exercise
- Pick one focal length (for example, 85mm) and reuse it across 5–10 portrait prompts.
- Check if the overall style and facial proportions look more consistent than when you do not specify focal length.
By repeatedly testing and comparing, you will develop an intuitive sense of how focal length keywords shape AI-generated imagery—and your prompts will start to feel more like deliberate “lens choices” than random guesses.